Monday 9 November 2015

A Simple WebRTC demo with Passport Authentication

Hello Guys

So as of late I went back to flexing my muscles on Web Development. I and a couple of friends decided to develop this awesome project built on top of WebRTC APIs.

The project facilitates peer-to-peer video-conferencing, file-sharing,and screen-sharing.It is aimed at large institution that are faced with the issue of travelling lecturers. The project should also facilitate peer-to-peer text communication.


As of now (November 9th 2015),however,text chat does not work-that does not mean it will not;it's work in progress. Video-conferencing works amazingly well,so does screen sharing and file-sharing.


I know you're just itching to get your hands on the code,but,the project I have to admit is very bulky(-thanks to the huge node modules and styles and locally hosted scripts).When am through I promise to host the code on my Github page and edit this blog-post accordingly.


So just a small lap around the project:there's a home page,a login/signup screen ,a profiles page,and and an activities page where you can go ahead and share with your peers.


Basically,


  1. I used NodeJS for the back-end(-this project had to be lightweight in functionality) 
  2. EJS(Embedded JavaScript) for templating,you can still use html
  3. MongoDB for storing user credentials 
  4. Passport for authentication
Here's the video ,tell me what you think.


Thursday 24 September 2015

HOUSEKEEPING;GETTING XAMARIN AND SETTING THINGS UP

Now that you've read all that chatter online about all the trade-offs of Web,Hybrid and Native cross-platform mobile app development am happy that you finally made that important decision i favor of Xamrin.

We're going to start off with a little house-keeping here;

  1. Let's register ourselves here and get Xamarin for Students from here.
  2. Great,go ahead and give your details.
  3. You'll be expected to prove that you're a student-a student email address will suffice for the most part coupled with your student ID or other evidence you may have.
  4. Once that is done you'll receive an email confirmation and links to download the latest version of Xamarin. You'll get an online installer which will download and set everything up for you.But,if your internet is as bad as mine normally is,do request for an offline installer for your OS-in my case I'm using a Windows 10 PC-7/8/8.1 still works.
  5. Once your download is complete,launch Xamarin and select the "Options" tab-however note that it'll ask you to login,do so with your Xamarin credentials.
  6. Now,hover over to the "Options" tab and click on it.


Now that is a good sign, but we're not out of the woods yet;

We have some other things to set up.
  1. If you love Visual Studio-like I do, Xamarin will seamlessly integrate with Visual Studio allowing you {Windows users} to use the environment you're most comfortable with
  2. We also need to ensure we can access Xamarin Component store and Nuget;now if your not accessing internet via a proxy server then you can skip this step and move on,else you need to listen good.Go to your environment settings(-Windows users) by typing "env",and "Choose edit system environment variables".Click on the "Environment Variables" button.
  3. In the new window,under "System Variable" click on "New" and create a variable by the name "http_proxy" -without the quotes -in the "Variable name" field and insert you proxy address in the "Variable value" field.Do the same for a new variable "https_proxy";for the most part the addresses are the same.I had to bring this up because it's an issue I had faced.
  4. Now we set up the emulators.You can get emulators from Google,that ships with Android SDK,you can get Xamarin Android Player form here  ,use Genymotion,or use Visual Studio Android Emulators from here.Do note that when you'll be using Genymotion or Xamarin Android Player,Oracle Virtual Box will need to be on and apparently,Virtual Box and Hyper-V do not play well.What I mean is you won't run Virtual Box when Hyper-V is enabled.You may use to stock Google Android Emulators or Visual Studio emulators(-creates virtual Android machine in Hyper-V).
  5. You're pretty much set to go.
Issues you may face(-Windows users);

Issue:You can not access internet when you install Hyper-V powered emulators
Fix: Delete all virtual switches,uninstall all network drivers(works in windows 10),and run the following commands as admin


  • netsh int ip reset reset.txt
  • netsh winsock reset
  • netsh advfirewall reset


Then reboot.

Issue:You can not access Component Store or Nuget.
Fix: Check if your proxy changed and reset them in the environment variable settings.

Issue:You can not run an emulator.
Some fix:This arises from so many issues;ranging from buggy Hyper-V,to low development machine memory.
Ensure you have added you emulator set-up app to list of exceptions in firewall settings(for Visual Studio Android emulator add XDE to communicate via firewall:
"C:\Program Files (x86)\Microsoft XDE\10.0.10240.0" and select XDE-path may vary.)
If it's a memory issue,close some apps(-check if "Evented I/o for v8 javascript" is running in the background,it's very famous for this).

So let's meet in the next blog and run our Hello World App!.


Saturday 12 September 2015

CROSS PLATFORM (MOBILE) APPS DEVELOPMENT


CAVEAT: Am not an experienced developer and most of which is expressed here
is based on my shallow research, do feel free to learn more via the various resources in the internet.

I had to get that out of the way.

Well, this series of blogs will take you through my journey as Xamarin developer from a noob(-which I currently am as I write this post) to a pro(-which I plan to be). I do warn you that I've chosen C# as my primary development language and am not turning back.

So, let's tackle the elephant in the room; cross-platform mobile application development.


This is where you-as a developer- develop a single app to target more than one operating system(mobile or desktops).This is the simplest definition I could come up with, to avoid being misinformed ,use Bing or Google or Yahoo or something!.

This is itself a brilliant step to take as you partake in your development journey. It means you'll be able to hit millions(-if not billions) of consumers worldwide with your great app.


To get you through this, there are tens of development environment out there that'll help you leverage your skills and reach your target. Well, most have very steep learning curves while some offer you the benefit of doubt that you'll get comfortable in "5 minutes after installation"(-Corona). The environments also vary, some offer you the opportunity to develop and emulate offline in your local machine(-Xamarin) others run fully in the cloud(-Rhomobile).With all these the languages used for each platform also vary. C#-Xamarin,C++/QML-Qt others rely on web technologies-Intel XDK;with some relying heavily on JavaScript-Appcelerator,or HTML5 -Phonegap/Apache Cordova,others rely on "exotic languages" like Lua - Corona...

That's a lot! Guess what you have your options narrowed down to 3 choices;
  1. Have a native app,
  2. Have a hybrid app,
  3. Have a web app.
There are trade-offs in making each of the options. You may run into issues such as problems normalizing your UI across platforms, laggy applications, having plugins not supported in certain APIs, lack of updates for certain plugins...

On the positive side most are FREE. Other come coupled with Mobile Backend-as-a-service(-Appcelerator) ,others even offer Cloud hosted testing devices for your apps-Xamarin. Plus a lot of great offerings from the multitude of companies.

Out of all these I chose Xamarin.

Why? Simple, I've never met a language as versatile as C#;run on web, run on mobile devices, run on desktops, run on IoT devices...etc and it does all these without breaking a sweat. Plus it's way more secure and great at garbage collection. Argue all you want, C# is great. ! :)

About Xamarin,you get to write your codes in C# for Android,Windows Phone(-Visual Studio) and iOs(-Desktop and Mac) with code sharing of up to 95%(-www.microsoftvirtualacademy.com).Whatever you want to do in Objective-C,Java or whatever, you can comfortably do it in C#;take lambda expressions for example.


Most of all Xamarin, is free for students!!! As long as you're a student and can prove it-go get it from xamarin.com/students. And it blends nicely with the best IDE in the world(-keep hating)-Visual Studio. You can also easily build cross platform games with so much ease.

I'll leave you with some great articles on cross-platform mobile application development and you'll surely see why Xamarin cut's it.

  1. Xamarin Home → xamarin.com
  2. Xamarin for students xamarin.com/students
  3. Xamarin Developer portal →developer.xamarin.com
  4. Xamarin blogs → blog.xamarin.com
  5. Cross-platform mobile app development options in Visual Studion https://www.visualstudio.com/en-us/features/mobile-app-development-vs.aspx
  6. Learn about PhoneGap features →http://phonegap.com/about/feature/
  7. Get Phonegap →http://phonegap.com/install/
  8. Get to know Corona → https://coronalabs.com/
  9. Some trade-offs of various platforms →http://www.developereconomics.com/pros-cons-top-5-cross-platform-tools/
  10. Featured list of most well known Cross-platform tools →http://appindex.com/blog/ten-best-cross-platform-development-mobile-enterprises/
  11. Intel XDK →https://software.intel.com/en-us/intel-xdk
  12. Over-view of cross-platform options including game development →http://thinkapps.com/blog/development/develop-for-ios-v-android-cross-platform-tools/
  13. Get to know Rhomobile →http://thinkapps.com/blog/development/develop-for-ios-v-android-cross-platform-tools/
Well this is not the exhausted list of dev tools available you surely find many more.

Read the articles and make your choice depending on the needs for your app or game.

Over the next series of blogs I'll walk you through getting Xamarin, Installing and some issues you may encounter and solutions.


See you in the next post!!

Friday 7 August 2015

Windows 10 Home Upgrade to Windows 10 Pro

Hi there.

The Urge

As a major geek I've always wished to develop for multiple platforms with very minimal change in codebase. Regardless of which PC you use you can quickly download any IDE( Visual Studio-Xamarin, Xamarin Studio, Android Studio, Intellij IDEA, Netbeans...just to name a few) install it and run a quick and dirty Android code on the fly. However when it comes to developing for Windows Mobile, it's a bit tricky. Visual Studio or Xamarin Forms; or probably some other IDE that you'll have to break the bank to get ,and that's not the end of it; if you're running Windows 8+/10 Home Edition you're faced with the challenge of emulating the development device. There's no Hyper-V in Windows Home edition, however powerful your machine may be. Bummer! You'll have to either buy Pro or developer-unlock a Lumia.


The Lumia 640 X-L


The Situation.


 With Windows 10 out, I must say my PC ranks somewhere amongst the 14 Million PCs that got Windows 10 on the first 24 hours of it's official launch. I got Windows 10 Home Edition. I was still faced with the hurdle of acquiring Hyper-V. Visual Studio Enterprise 2015 was out. And it was the best IDE I've ever seen; Kudos to the Visual Studio team!! I could not let another edition of Visual Studio go without a Windows Phone app.


The Idea

 I've had MSDN subscription since March and with it come license keys for Windows OS and Visual Studio. I recalled a day I was having Windows 8.1 and I wanted the Pro Edition so bad that I decided to cook-up my own keys. They all failed of course but... That idea resurfaced, I had a friend download a Windows 10 ISO and use their MSDN license key to activate it. It then hit me, if the key were to fail, I'll still retain the original, right? Much Logic, Much Wow!!! I threw all caution to the wind and decided to try it out.


The Process

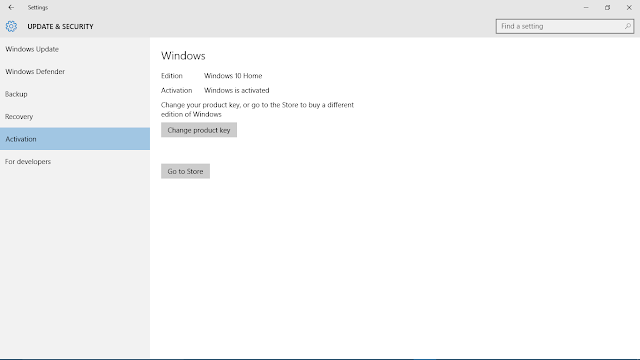
I logged in to my MSDN account and quickly retrieved my Windows 10 x64 keys. I went to Settings > Updates & Security > Activation and keyed in one of my MSDN keys. To my shock, it actually worked and asked if I'd like to "Upgrade"...

The next series of screen shows the proceeding Windows:
They'll be a series of restarts-three for my case.
New features will be added,updates will be installed...
Upgrade Screen


Getting Ready


Activation Screen


The activation requires Internet access...
Search for winver...
winver


You can now go ahead and turn on Hyper-V.

Big take away from this? get an MSDN account you'll never know when it'll come in handy.
msdn.microsoft.com

Friday 29 May 2015

Arduino Relay and LDR Ciruit and Proteus Simulation

Suppose you'd like to create an LDR controlled circuit.
This circuit may perform something simple ,for example in our case switch an LED on and off, or may be extended to controlled a light affected process such as masking (imprinting onto) a PCB board or and other use you may find for it.

We're going design this simple circuit (Arduino being the major component) and use a simulation tool like Proteus(ISIS) tool simulate it.
The circuit schematic design will also be done using Proteus .

The Arduino Code is fairly simple;just a few lines of code:


const int sensorPin = 0; //LDR sensor will connect here
int solenoidPin = 2;

void setup(){
pinMode(solenoidPin,OUTPUT);
}

void loop(){
int rate = analogRead(sensorPin);

if(rate>10){

digitalWrite(solenoidPin,HIGH);


}else{
digitalWrite(solenoidPin,LOW);
}

}

Next is the circuit:

When you run this you should see this:
Now a little explanation: 
The Arduino reads the Analog input from the LDR and a value of  10(possibly intensity),
When this input value is greater than 10, the LED will go off.

NOTES:
You need the Arduino IDE or Atmel Studio(-with Visual Micro Plugin);
When you build a sketch in Atmel Studio, the .hex file is stord within the "Debug" folder of your sketch. Copy this .hex file in to a directory which you can easily access,double click on your Proteus schematic and select the program file option and navigate to the .hex file directory.

However when using the Arduino IDE the .hex file is stored in %temp%  (Temporary folder in your Appdata-Windows users), the remainder of the process remains the same for linking into Proteus.

Proteus components:
1N40001,2N2222,ARDUINO UNO,LED,1 Kilo Ohm resistor,10 Kilo Ohm resistor,Torch_LDR,Relay.

Then run it.
Happy Coding...

Thursday 23 April 2015

Check-boxes that disables or enables an input field

Today we're going to write some codes that'll help us check and un-check checkboxes and as a result will disable or enable various input fields;

Step 1: The HTML
In this instance, we're going to create the input fields,checkboxes and everything needed for the layout. 
Create a html document of any name; I called mine "scripts.html".


<!DOCTYPE html>

<html>

<head>

 <title>Simple Check boxes</title>

 <script type="text/javascript" src="./auth.js"></script>

 <link rel="stylesheet" type="text/css" href="./bootstrap.min.css">

</head>

<body>

<form role="form" name="payment">


                            <div class="checkbox">

                                <p>Payment Option</p>

                                <label class="checkbox-inline">

                                    <input type="checkbox" value="cash" checked>Cash

                                </label>

                                <label class="checkbox-inline">

                                    <input type="checkbox" value="mobile" name="mobilecheckstat" onchange="enableIn()"> Mobile Payment

                                </label>

                                <label class="checkbox-inline">

                                    <input type="checkbox" value="credit" name="credcheckstat" onchange="enableIn()"> Credit Card

                                </label>

                                <label class="checkbox-inline">

                                    <input type="checkbox" value="club" name="clubstat" onchange="enableIn()"> Club Card

                                </label>

                            </div>

                            <div class="form-group input-group">

                                <span class="input-group-addon">Credit Card Number</span>

                                <input type="number" class="form-control" name="cred" autocomplete="off" required="required" placeholder="Enter Credit Card Number">

                            </div>

                            <div class="form-group input-group">

                                <span class="input-group-addon">Club Card Number</span>

                                <input type="number" class="form-control" name="club" autocomplete="off" required="required" placeholder="Enter Club Card Number">

                            </div>

                            <div class="form-group input-group">

                                <span class="input-group-addon">Mobile Pay Transaction ID</span>

                                <input type="number" class="form-control" name="mobile" autocomplete="off" required="required" placeholder="Enter Mobile Pay Transaction ID (eg XX123..)">

                            </div>

                            <div class="form-group input-group">

                                <span class="input-group-addon">Amount</span>

                                <input type="number" class="form-control" autocomplete="off" required="required" placeholder="Amount To be Paid">

                            </div>

                            </form>

                            <script src="./bootstrap.min.js"></script>

</body>

</html>


Step 2: The Output


The Expected output from the above code
Now let's work on the java script to facilitate this function:

Step 3: The Javascript
Create a Javascript file of any name; I called mine "auth.js".


function start() {     payment.cred.disabled = true;     payment.club.disabled = true;     payment.mobile.disabled = true; } onload = start; function enableIn() {     payment.cred.disabled = !payment.credcheckstat.checked;     payment.club.disabled = !payment.clubstat.checked;     payment.mobile.disabled = !payment.mobilecheckstat.checked; }


And that's it.

PS. I included some bootstrap within the code-it's completely optional.